PyMol 2
- Stephan Heijl
- Tom van den Bergh
This is a guide intended to help you install and manage the Bio-Prodict 3DM PyMol Plugin in PyMol 2.
PyMol includes an easy-to-use plugin repository that lets you effortlessly download and install the Bio-Prodict 3DM PyMol Plugin. The latest stable version number can be found here.
This is the documentation for installation under PyMol 2.x. You may find the installation instructions for 1.8.x here.
Index
Basic (Recommended)
Installing PyMol
You need PyMol to run this plugin. We support the 1.8.x and the 2.x version of PyMol at this time.
Download the PyMol binaries from PyMol.org, or get the source from SourceForge.net and build the program yourself.
3DM plugin installation
Before you start the installation, you will need to determine which version of the plugin you would like:
- The most stable, reliable version (Stable)
- The most cutting-edge version with the newest features (Edge)
To start the installation, you need to:
- Start PyMol
- Click on Plugin in the control window (the top menu bar in MacOS)
- Select Plugin Manager from the dropdown
- In the Plugin Manager window, go to the Install new plugin tab.
- Click on Add in the lower left of the window.
- Enter the URL for the repository you want use in the URL field and click okay.
The 3DM plugin is released in these two versions. If you want to use the newest features, it is recommended that you pick the Edge repository. If you would rather have the best tested version, you can pick the Stable repository.
Repository URLs: - Select the repository from the Repositories list.
- Select the 3dm_plugin_<repository>.zip file in the Items list
- Confirm that you want to install into the default directory.
- Click Install
- Restart PyMol
- Open the 3DM plugin from the Plugin > Legacy Plugins menu.
- To test the PyMol-3DM connection, follow the instructions here.
If you encounter any problems during this installation, please proceed to the manual installation steps or look at common issues in the Troubleshooting chapter below.
Advanced
Installation (Manual)
Before installing, you will need to download plugin .zip file from our servers.
- Stable: https://plugin.bio-prodict.nl/pymol/stable/3dm_plugin_pymol_stable.zip
- Edge: https://plugin.bio-prodict.nl/pymol/edge/3dm_plugin_pymol_edge.zip
Store it in a location where you can later find it again.
To start the installation, you need to:
- Start PyMol
- Click on Plugins in the control window
- Select Plugin Manager from the dropdown
- In the Plugin Manager window, go to the Install new plugin tab.
- Click on Choose file in the Install from local file frame.
- Select the zip file you downloaded beforehand.
- The plugin will now be installed. Answer affirmatively to any prompts you may receive.
Once you have restarted PyMol, the 3DM plugin can be called from the Plugins menu. To test the PyMol-3DM connection, follow the instructions here.
Finding out my current plugin version
To find out which version of the plugin you are currently running, perform the following steps:
- Start PyMol
- Click on Plugins in the control window
- Select Plugin Manager from the dropdown
- In the list of installed plugins that appears, find bioprodict.
- The version number is located directly beside the name of the plugin.
Updating the plugin
To update the plugin, follow these steps.
- Start PyMol
- Click on Plugins in the control window
- Select Plugin Manager from the dropdown
- In the Plugin Manager window, go to the Install new plugin tab.
- Click on the Bio-Prodict repository. You may have to scroll through the repository list to see it.
- If there are no repository urls with plugin.bio-prodict.nl listed, follow the Recommended installation steps to add the repository.
- Select the 3dm_plugin_<repository>.zip file in the Items list.
- Click on install.
- PyMol will prompt you that you already have the plugin installed. Acknowledge that you wish to replace it.
- The plugin has been updated.
Removing the plugin
To remove the plugin, follow these steps.
- Start PyMol
- Click on Plugins in the control window
- Select Plugin Manager from the dropdown
- In the list of installed plugins that appears, find bioprodict.
- Click "uninstall"
- The plugin has been removed.
Selecting a repository
For maximum compatibility, please ensure that you only have one version of the plugin installed. You can have more than one repository in your repository list in the plugin manager, but using both the edge and the stable version is not supported.
Adjusting API URLs in the configuration
If you are running a 3DM installation on a server that is not hosted by Bio-Prodict, you will need to change the configuration of the plugin to speak to that server. To do so, you will need to alter the plugin configuration file the PyMol plugin loads. There are two ways of doing this.
Note: please contact your systems provider in order to get the correct URLs for your configuration before starting either procedure.
Basic method
Currently, this procedure will need to be run every time the plugin is updated, as the default configuration is included as part of the plugin. It is, however, rather simple to perform.
- Open your favorite plain-text editor (notepad, gedit, kate...)
- Find the configuration file. It is located here:
<PyMol Directory>/modules/pmg_tk/startup/bio-prodict/config.json - It is recommended that you make a backup of the config.json file, so you can quickly and easily revert to the previous settings.
- Open the config.json file with your editor.
- Replace each of the URLs in this file with the proper URL for your server.
- Save the file and exit your text editor.
- Restart PyMol to have the settings take effect.
If you have entered a wrong URL, PyMol will alert you of that fact when you start using the 3DM plugin.
Advanced method
This method will only need to be applied once, but is more involved. You may need experience with the command line for your operating system.
- Find the configuration file. It is located here:
<PyMol Directory>/modules/pmg_tk/startup/bio-prodict/config.json - Copy this file to another directory where you have write and read access.
- Using your favorite plain-text editor, replace the urls in the copied file with the proper urls for your server.
- Save the file and exit your editor.
- When starting PyMol from here on out, start it with the THREEDM_PLUGIN_CONFIG environment variable pointing to the location of the copied file you created.
- For Linux and Mac OSX, this involves launching PyMol from the terminal like this:THREEDM_PLUGIN_CONFIG=/path/to/config.json <PyMol Directory>/pymol
- In Windows, you can either set a System Environment Variable, or create a shortcut to the PyMol executable with the THREEDM_PLUGIN_CONFIG variable set. You can also use PowerShell to launch PyMol with the variable.
If you have entered a wrong URL, PyMol will alert you of that fact when you start using the 3DM plugin.
Using the PyMol plugin with a proxy
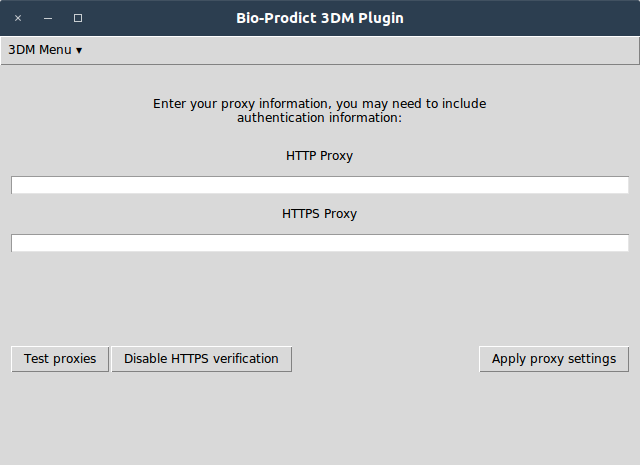
Using the PyMol plugin with your proxy is easier than ever with our integrated proxy settings screen. You can find this settings screen under 3DM > Info > Set proxy information. You do not need to be logged in to set your proxy settings. Simply enter your HTTP(S) proxy urls in the text fields, click Test proxy to verify your proxy works, and click Apply proxy settings to apply the changes. You may need to restart PyMol for the settings to take effect. If our plugin detects that access to the proxy information is required, it will automatically show the proxy information window.
If you have proxy settings defined as environment variables, these will take precedence over the those set in the built-in menu.
Proxy troubleshooting
I entered the correct proxy server, but testing results in an error with code 407.
Your proxy requires authentication information to proceed. You may need to retrieve this information from your IT department. Please enter the proxy information in the following format:
        http://<username>:<password>@<proxy_server>/
        https://<username>:<password>@<proxy_server>/
I am required to connect to a proxy, but the proxy settings screen does not pop up/is empty.
Automatic update checking is turned off and our plugin cannot detect the need for a proxy. Please turn on automatic update checking in the configuration file, or enter the proxy information in the .PROXIES file. (see below)
I get OpenSSL errors when I attempt to connect using a proxy.
Your workplace may use a custom certificate to authenticate HTTPS requests. You can disable HTTPS verification from the Proxy information menu (second button on the left). This will set the verify_https option in the config file to False. You must restart PyMol for the settings to take effect. You may reenable verification in the same way.
I encounter a ConnectionError, or a message stating the my proxy is not setup correctly.
- Navigate to the location where you installed PyMol in Explorer. This is likely C:\Program Files\PyMol .
- Inside this directory, navigate to \lib\python3.7\site-packages\pmg_tk\startup\bioprodict
- Open the config.json file in notepad (or your favorite plain text editor)
- Find the line that says: "verify_https": true , change true to false to disable this setting.
- Save the file.
- Restart PyMol, the plugin should now work.
I would like to automatically transfer the proxy information.
The plugin gathers its proxy information from the .PROXIES file, situated in the directory where PyMol is run from. It will be automatically created when you click "Apply proxy settings." You can transfer this file between computers and between versions, or create it yourself. It is formatted like this (username and password optional):
{ "http": "http://<username>:<password>@<proxy_server>/", "https": "https://<username>:<password>@<proxy_server>/" }
Troubleshooting
I encounter an SSLError without using a proxy.
To guarantee a secure connection to the Bio-Prodict servers, we use HTTPS to establish secure connections when retrieving content. If your OpenSSL version is not up to date, you will get the following error when you try to log in:
requests.exceptions.SSLError: [Errno 1] _ssl.c:504: error:0D0890A1:asn1
      encoding routines:ASN1_verify:unknown message digest algorithm
Installing the latest version of OpenSSL is easy if you currently have Homebrew installed. If not, please refer to the installation instructions on the Homebrew website.
- With Homebrew installed, launch a Terminal window.
- In this window, type the following instructions in order:
- brew update
- brew install openssl
- brew link --force openssl
- If you had PyMol open, restart it.
Unable to retrieve version error
1. Navigate to the location where you installed PyMol in Explorer. This is likely C:\Program Files\YASARA .
2. Inside this directory, navigate to plg\bioprodict
3. Open the config.json file in notepad (or your favorite plain text editor)
4. Find the line that says: "verify_https": true , change true to false to disable this setting.
5. Save the file.
6. Restart YASARA, the plugin should now work.
I am using MacOS and I can't copy/paste my credentials.
XQuartz binds copy/paste specifically to Ctrl+C/Ctrl+V as opposed to Cmd+C/Cmd+V.
I encounter an XQuartz error
XQuartz is a compatibility layer for OSX/MacOS that is required to launch the 3DM plugin. Please install XQuarts using the instructions on their website: https://www.xquartz.org/
I installed XQuartz and restarted my Mac, but I still get XQuartz errors
Make sure that your X11 libraries are installed correctly. You may need to symlink the install directory to the directory expected by PyMOL. This can be done by
- Opening a Terminal
- Typing: sudo ln -s /usr/X11 /usr/local/opt/libx11
- Pressing Enter
- Entering your password
- Restarting PyMol